Parabolic microphones can be expensive to buy, but you can make one relatively easily and at little cost. In today’s article, we’ll show step by step how to make a DIY Parabolic Microphone

We are always looking for new technology to use in our homes and our daily endeavors. There is so much information out there can we can make basically anything these days, just by doing the right research and by putting in the right amount of time. Of course, science and technology are not easy subjects to understand if you don’t dedicate the right amount of effort to understanding the basics, but it can be done.
Today, we explain how to make a DIY parabolic microphone. These are usually only seen in spy movies, but they are very real and very effective.
You can easily make a homemade parabolic microphone but first, let’s explain a bit about what they are and how they work.
What is a Parabolic Microphone?
Parabolics, to explain it in simple terms, allows the collection of sound, energy, or light, via an item which is a certain shape, and which allows for the collection of energy at a certain point, e.g. usually the center. To make this easier to understand, we should simply think about a satellite dish.
A satellite dish is a large circle, and it has receivers which come from the middle. This receives electromagnetic signals from space, which are sent down to Earth via satellites. These are then scrambled and turned into a picture or sound, via a transmitter and box which is attached to your TV. You can then watch TV from anywhere in the world.
So, we’ve mentioned satellite dishes, but how does this work in terms of a parabolic microphone?
Any sound, be it a voice or a musical note, is carried through the air via waves, e.g. sound-waves. But as they travel further from the source they weaken in strength, becoming less audible.
It doesn’t matter what direction the sound goes in; the same information is held within it and it’s just how clear it is that matters. When sound hits a hard surface, it can bounce and reflect, sending it in another direction. This is what causes echoes, and what also causes noise to reverberate around a room.
When using a parabolic disk or surface, we can focus multiple sound waves from a single source on a single point. The parabolic shape is perfect for this and can “collect” many sound waves, that are then amplified at the central point, or focus of the disk. This enables us to hear sound from distant locations as if we were actually much closer to them.
However, we can’t just place our head in the parabolic dish and expect to hear clear, defined sound. The size of our head is far too large and as the signal is likely to be very weak, it first needs to be amplified. At the focal point of the parabolic dish (where the reflected sound waves are focused), there is a microphone that converts the sound into electrical signals. These electrical signals are then amplified before they are ready for us to hear using earphones or a speaker.
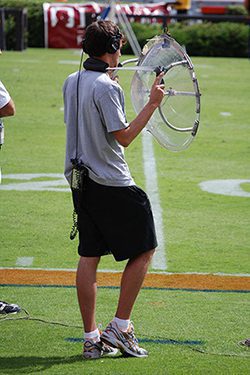
These devices are commonly used when you want to hear something from a distance, and when you are only interested in the sound from a specific source and not the background noise. They are used in television broadcasts of sports to capture something being said by an athlete or umpire, and also in covert operations where remaining hidden is critical.
[spacer height=”20px”]
DIY Parabolic Microphone - How to make it
Now we know what a parabolic microphone is and how it works, we need to talk about how to make one. We know that a parabolic microphone is used to receive sound from a distance, but how can we achieve this effect ourselves?
There are many kits you can buy online which will give you all the components you require and make it easier to build your parabolic microphone dish, and therefore, your end result, but we are going to make a completely DIY Parabolic Microphone.
What you’ll need:
- An old large salad bowl or something of similar shape
- An old metal coat hanger
- A clip-on microphone
- Strong glue or solder iron
- Portable audio recorder (can use a cellphone instead)
- Headphones
The first thing you need to prepare is the most important part of our homemade parabolic microphone. This is the surface from which you’re going to reflect noise. We call this the parabolic reflector. This can be anything from an old television satellite to a metal salad bowl, or even the dog’s old water bowl.
But, the quality of the material of the parabolic reflector will define how well your set-up works. Something metallic, thick plastic, or acrylic would be ideal. An aluminum wok lid, for example, would be perfect. It’s important that the surface is as uniform and as flat as possible, just take a look at a satellite dish for inspiration. If you’re stuck for ideas or resources, you can also [easyazon_link identifier=”B00A3DHWUK” locale=”US” tag=”stealthyninjas-20″]buy a parabolic reflector[/easyazon_link] online.
Key features of our dish:
- It must be rigid and reasonably thick and made of either metal, acrylic, or plastic. But remember it has to be portable too.
- We want a smooth curve on the dish. Ideally, the bottom should not be flat.
- A larger dish is probably better. However, science suggests that it might have to be impractically huge to perform better with low-frequency sound.

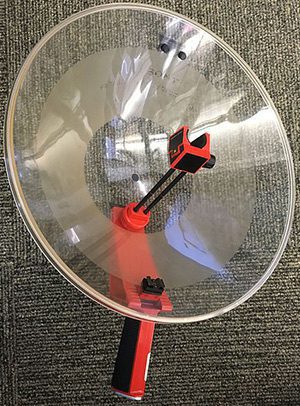
Next, we need to make the stem on which the microphone will be attached. If you can make a hole in the center of the dish this will be very easy. Otherwise, you might need some strong glue or even a solder iron. The material that you use for the mic arm isn’t really important, as long as it’s strong enough to hold a small microphone. The thinner it is though, the less it will block sound waves from reaching the microphone. The wire from an old metal coat hanger would work just fine.
Next, we want to attach a microphone to the parabolic focus of our dish. Finding the focal point is a critical step that will make or break our device. We can do this in a couple of ways:
- Clip on the microphone, plug it into whatever you are using to record and listen through your headphones. Point the dish at a steady sound source that remains constant. Then move the microphone up and down the stem. The point at which you get the loudest sound through your headphones is the focal point.
- You can use a laser pen and point it at your dish. Get a friend to mark the point where the laser is reflected onto the stem/shaft.

The best type of microphone to use is a small handheld microphone with a cardioid polar pattern. This type of microphone will reject sound coming from behind it. This helps so that the microphone is only focusing on the reflected sound from our source. The other option is a small clip-on (lavalier) microphone. This kind of mic is much easier to mount and will work better with smaller dishes.
You can actually get a pretty cheap clip-on lavalier microphone that connects to your cell phone or iPad. It would make life really straightforward and very convenient.
An important thing to remember when mounting the microphone is that it should face into the dish. We don’t care about anything except the reflections going to the focal point.
So, with the microphone mounted at the focal point, all that’s left to do is to plug it into a portable sound recorder (or cell phone) and listen through your headphones.
It might take a bit of practice to target the source of the sound properly, but you’ll get it in no time.
Take your spy game to the next level with our guide to spy gadgets that you can make with the kids.
We hope you enjoyed the post, and we’d love to hear how you got on with your project. Let us know down below in the comments!
Image Sources:
By Richard Bartz, Munich aka Makro Freak from Wikimedia Commons
By Cmglee from Wikimedia Commons


Thank you ! Clear and easy instructions , looking to build a Parabolic without the high cost. Appreciate the information and will let you know how it works.
No Problem at all! They’re such cool pieces of equipment 🙂
Can’t wait to hear how you get on!